By Tiffany Chen, Speech-Language Pathologist
Thanks to ELG’s Tiffany Chen for allowing us to cross-post from her blog, SpeechWithinReach SLP
Looking for something simple but exciting that will keep your toddler or young child occupied? Look no further because a sensory bottle may be just what you need!
What is a sensory bottle?
A sensory bottle is a container that holds different objects with different properties. There are many possibilities, which leads to different names, e.g. a calm-down bottle, a sensory jar, but they are all the same concept! Sensory bottles are a safe way for children to explore different senses without the mess and risk of choking hazards.
What senses can be incorporated?
-
Auditory/Sound: Clinking objects against the bottle, whirling of water
-
Visual: Colors, glitter, falling objects
-
Proprioception: Watching objects move around inside the bottle, shaking the bottle
-
Vestibular: Balancing motions, spinning the bottle
These senses help regulate the child if they feel overwhelmed by other stimuli, hence calming them down. However, it can be used to explore different senses and understand the relationship of objects and the properties or qualities of different objects.
What can I teach my child when we make a sensory bottle?
1. Academics:
-
Colors: What colors do you see? Is it dark or light?
-
Numbers: How many do you see? Are there few or many?
-
Shapes: What shapes do you see?
-
Matching: Are they the same? How are they the same or different?
2. Language:
-
Explain: What do they see in the bottle?
-
Describe: After making the sensory bottle, ask your child how they made it, this is also a great chance to practice sequencing!
-
Opinions: Talk about what they like about the sensory bottle
-
Vocabularly: Talk about the different properties of the objects
-
Prediction: Talk about what might happen if they do something differently. What would happen if you gave it a big shake?
3. Science:
-
Sink/Float: Which objects will sink and which objects will float?
-
Prediction/Observation: What do you think will happen next?
-
Absorption: Which objects will absorb the most water? Do any dissolve?
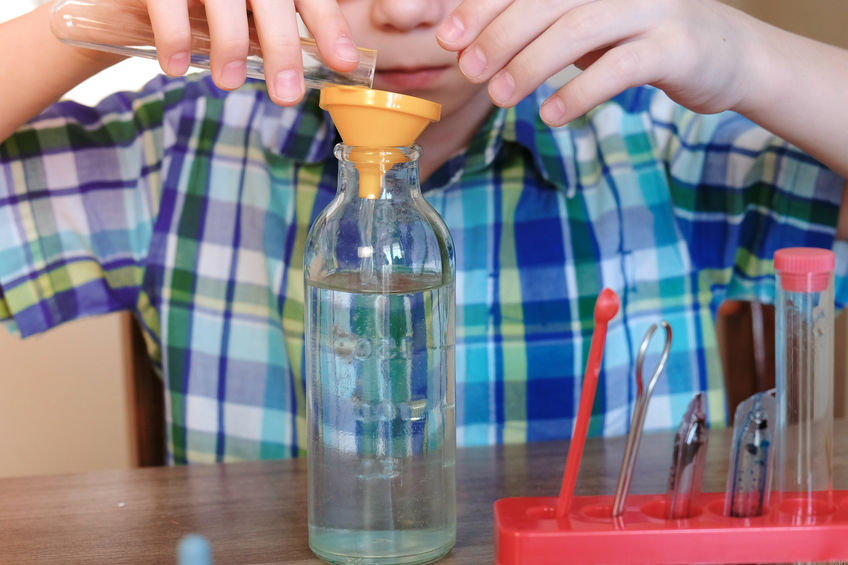
How do you make a sensory bottle?
-
Main Ingredients: Water, dish soap, glycerin (or baby oil)
-
Optional add-ins: Glitter, food-coloring, small beads, small toys, small objects…anything actually!
First, fill the bottle with 1/4 cup water.
Next, add glitter. Now would be a good time to add the optional add-ins.
Then, pour in 3/4 cup of glycerin or baby oil. This helps the glitter slow down as it falls.
Then, put 3-4 spoons of dish soap into the bottle. This creates the bubbly effect.
Last, add a few drops of food coloring, and give it a good SHAKE!!
Here is a short video showing you how I make a sensory bottle!
Sensory bottles are easy to make and exciting! Have fun and get creative with what you add to your bottles!
Looking for more fun ways to introduce language? Check out our other activities in the series: Science with Toddlers and Young Children